How to build a $10 visible, IR, and UV light meter

Parts cost around $10.00 US. Gain switch has 5 positions, each an order of magnitude more sensitive from very dim room light to very bright sunlight. (Slight modifications allow extends sensitivity an extra factor of 1000, and neutral density filters can be used for bright light.)

Sensitive from mid-IR to mid-UV. With filters can look only at UV, IR, Visible, individual colours, polarization, etc. Easy to build with tools at home – just use a drill, saw and soldering iron. Works with any cheap multimeter permits quantitative measurements for an enormous number of existing experiments (eg. 1/R 2 law, efficiency of different light sources, polarization of light sources, emission spectra etc.)

Get instructions from directory index, PDF and .doc files available

Via MAKE Blog
How to make a Nikon D70 IR remote control

John Wagner from Team Droid writes:

This is just the thing you need to have in your camera bag. I have one that I bought online but if your not in a rush and have the skills to solder this would be a clever little device to have around. Very handy for tripping the shutter when your doing macro work or your doing long exposures where camera vibration is a bad thing.

Check out the plans, source and schematic included!

Via MAKE Blog

DIY half-frame camera mod

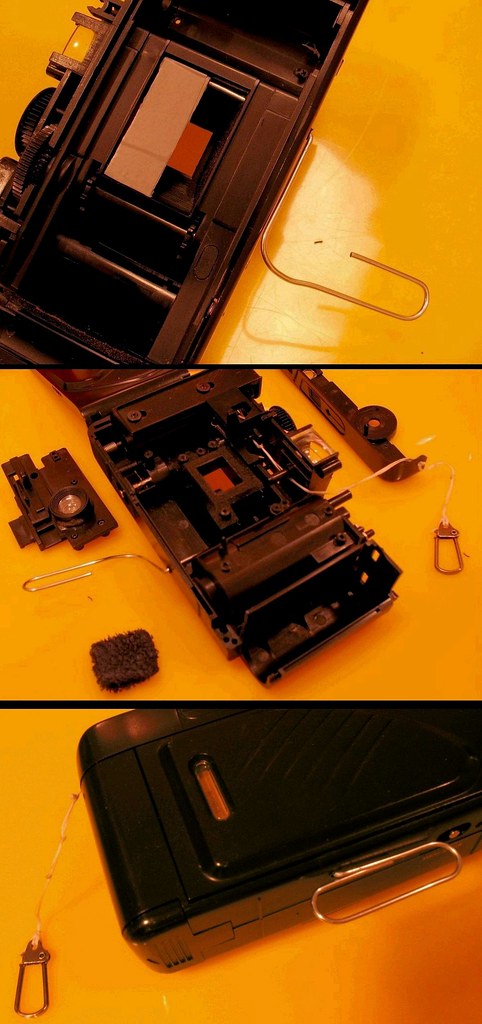
DIY half-frame camera by bricolage.108

Check out this sweet half-frame camera modification by bricolage.108!

If I understand the annotated version on Flickr correctly, he’s put in a sliding mask that blocks off half the frame at a time and a cord that you pull to re-cock the shutter without advancing the frame. So the sequence is: make an exposure, move the sliding mask to the other half of the frame with the paper clip, re-cock the shutter by pulling the dental floss, make another exposure, advance the film, re-set the mask, and start over again. Excellent!

In addition to the obvious benefit of getting twice as many exposures per roll, there’s an artistic benefit as well: since it doubles the enlargement factor over a normal frame of 35mm, you can get the grain to fall apart at smaller print sizes. Granted, most people seem to want to go in the other direction, but I really like that look for certain types of images.

UPDATE: Mr. 108 has added more notes on the photo and an excellent description of how he did it as well as some photos he made with this camera. I can’t wait to try this!

I also forgot to mention that he’s the same guy who came up with the inspired double-sided lens/pinhole bi-cam hack. Way to go, bricolage.108!

DSLRs and pinholes made from film: a match made in heaven

I posted the other day about Roger Cline‘s instructions for making perfect pinholes and zone plates using graphic arts film, which is totally sweet on its own. Repeatable and perfect pinholes? YES!

But wait! There’s more! I just realized that Cline’s method is a huge boon for people who shoot digital. It’s easy and cheap enough to make a pinhole body cap for a DSLR (or you can buy one from holgamods if you’re not the DIY sort), but there is a problem: digital sensors become charged and literally suck in dust like a magnet. Normally it’s a good idea to put some sort of clear filter behind the pinhole to prevent dusty build-up, but this is a cheaper, less complicated, and automatically fixes the problem. No hole to the outside, no dust! Nice!

How to un-jam a Hasselblad V-series body

Here’s how to solve one of those "oh, shit" moments, when your Hasselblad body gets stuck:

Ordinarily the lens and body are both cocked. You cannot install a lens unless both the lens and the body are cocked. However, you cannot remove a lens unless both units are cocked. When the condition is otherwise, the lens cannot be removed. This condition is called "jammed". It is really not that way. It is just that the cocked-cocked combination is no longer present. I have found that the lens is the normal culprit for getting the pair out of sync. Sometimes the lens can fire without being told to do so. This causes the lens and body to be out of sync.

Continue reading the how-to (with pictures) at PhotoWeb Tech

Homemade strobe slave

Photography enthusiast Nick Pagazani was hindered by the range and fixed location of his camera’s flash. Since his camera has no connector for an external flash, he needed a light-activated slave trigger to fire a remote strobe. It had to ignore the pre-flashes used for red-eye correction and fire only on the main flash. His solution: Use a microcontroller to count pulses from a phototransistor and trigger the strobe at a switch-selectable count. Brighten up your shadowy background with this flashy accessory.

Get parts list and assembly instructions at Design News

Via MAKE Blog

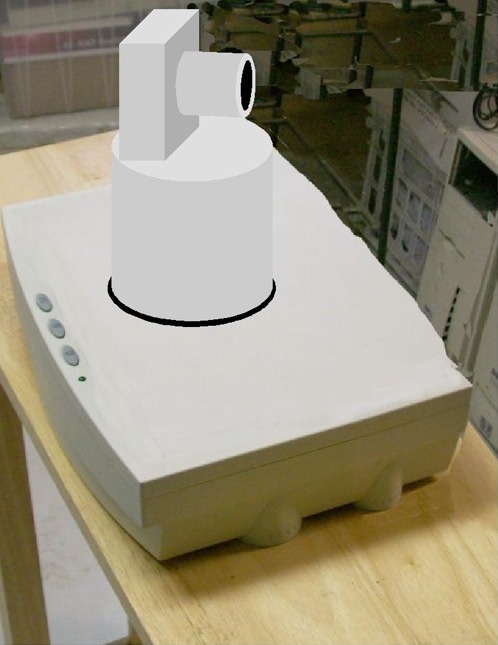
The making of the PanoramaScanCam

Mac A. Cody's PanoramaScanCam concept rendering

Mac A. Cody writes:

On one of my robots, I wanted to place a camera that could observe everything around it. The camera did not have to have a high frame rate. It was not going to be used for motion capture or real-time autonomous driving. It did need to have a 360 degree field of view. Think in terms of the cameras on the Mars Viking landers of the 1970s.

PanoramaScanCam™ is my implementation of a panoramic camera implemented using the components of a flatbed scanner. This is not an original concept. Flatbed scanners have been used as cameras by a number of experimental photographers…

Check it out!

Via MAKE Blog

Cheap DIY UV photography?

Instructables member Tool Using Animal writes:

For years I’ve wanted to mess around with UV photography. Unfortunately, all the websites on DIY UV seem to assume an infinite amount of money and access to specialized equipment on my part. There are two things that I don’t like, when someone tells me I HAVE to spend a lot of money (quartz lenses starting at $3000) or that i need specialized equipment (Wratten 18A filters, not cheap either). So I set out to do it my way, and here’s my $5 solution to UV wavelength photography.

Read instructions at Instructables

mc at uga at edu posted this comment at MAKE Blog (where I found this link):

I don’t want to be a party-pooper, but I’m not at all sure this is ultraviolet photography. Certainly the light bulb piece is a good substitute for an expensive filter, but is the camera responding to UV or to the small amounts of visible light that also get through? Most camera lenses block UV almost totally. If they didn’t, color rendition would be poor.

I suggest making a UV pinhole camera. Film (black-and-white) is very sensitive to UV if there isn’t any glass in the path.

The optical cement used to glue the elements together in modern lenses does block a good deal of UV already, so I suspect that mc is correct, but I’m not 100%. Anyone have any further insight?