Will Dunniway announces 2008 collodion workshops

Wet plate collodion artist and educator Will Dunniway writes:

Greetings ~ I have been practicing in this craft since 1990 and just recently have begun to teach this skill in wet plate collodion workshops across the country. The workshops in Corona are for 2 days and the Montana workshop, 4 days. My experience credentials to teach this all but lost 19th century process is my years in the field working with this wet plate collodion process. For inquiries email me at: silverandsun@mac.com, or go to my web site www.collodion-artist.com for more information.

On my web page, the workshop schedule is being revised. The following is the latest. Thanks, and just maybe I will be hearing from a few of you>>>Will

The basic course description

Students will learn the making of ambrotypes (glass direct positives) and tintypes. (Ferrotypes, tin plate direct positives) Students are guided through the process step-by-step from the mixing, pouring, exposing and development of plates poured with wet collodion. The newest edition now is 4 color of the manual, Making the Wet Collodion Plate in 16 Steps manual by Will Dunniway is included along with all materials in the course fee. Students will use a period 1860 field camera with 1860-70 lenses. Workshop features 2 days of intensive hands-on training in the making of ambrotypes, ferrotypes (tintypes), and glass plate negatives. Each student will make and take home a self-portrait/still life tintype/ambrotypes. All materials and equipment provided.

The 4 day workshops include a day shooting with a Brownie type box camera that you keep. Intensifying glass negatives and printing from these negatives with salt paper.

January 19–20, Corona, California – WINTER Wet Plate collodion Workshop
Collodion Photography
Tentative, see www.collodion-artist.com

April 12–13, Corona, California – Julia Dean Wet Plate Collodion Workshop
Collodion Photography
Tentative, www.juliadean.com/2008summer/collodion.html

June 20–21, Corona, California – Summer Wet Plate Collodion Workshop
Collodion Photography
Tentative, see www.collodion-artist.com

July 6–11 Condon, Montana – Photographer Formulary Workshop on Collodion Photography
(See: www.photoformulary.com to register)

October 4–5, Corona, California – FALL Wet Plate collodion Workshop
Collodion Photography
Tentative, see www.collodion-artist.com

f295 Seminar on Contemporary Alternative Photography, NYC, US

Tom Persinger writes:

I’d like to let you all know about The f295 Seminar on Contemporary Alternative Photography, hosted by B&H Photo, Video and Pro-Audio on Sunday, January 27 [2008] from 10:30am – 4:30pm [in New York City]. The event will take place in their brand new, state-of-the-art multimedia Events Room. The event features lectures, demonstrations, and discussion about contemporary alternative photographic practices and information about the upcoming f295 Symposium.

The following photographers/artists will give talks and be available for question/answer: Craig Barber, Laura Blacklow, Jill Enfield, Jesseca Ferguson, Scott McMahon, Erin Malone, Tom Persinger and Jerry Spagnoli.

Seating is limited! come early to be sure to get a spot!

See you there!
Tom

PS: We’ll be holding a drawing to give away one free pass to attend the f295 Symposium at this seminar!

Large format lesson learned: use a fucking notebook

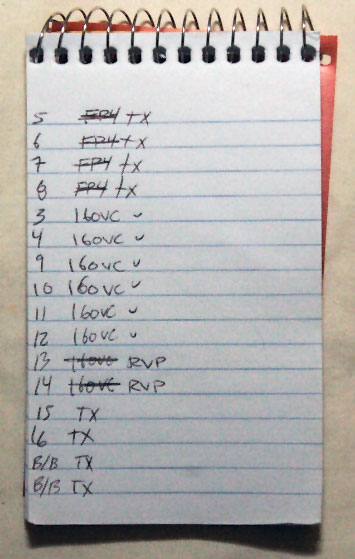
I like to load up several different types of film when I go out to shoot large format, at the very least a B&W and a colour negative. I usually try to stick to some sort of easy-to-remember loading scheme, like holders 1–5 are colour and 6–10 are B&W. Easy as that should be, I constantly got them mixed up in the field. Or I’d get it half-right, remembering that holder x held black and white, but forgetting that I’d loaded an ISO 100 film instead of the Tri-X I’d been using steadily for a few weeks, and shoot it 2–3 stops under.

A few weeks ago I was out shooting with my friend Jonathan and got the holders royally fucked up and ended up not getting several shots the way I wanted to. I didn’t get the results I was after, and I blew a good 20–30 minutes of waiting for light. No more!

I’ve always resisted carrying a pad, because documentation a) isn’t fun, b) is distracting, c) hurts (I have bad hands and writing is painful), and d) often seems to become a fetish, and I’m not interested in any of those things. But something had to give, so I ponied up the 89 cents or whatever it was for a little pocket notebook, in which I now keep a list of holder numbers and what film is in each, and other useful stuff, like bellows tables and the reciprocity corrections for the films I use.

Surprise! There is a middle ground between novel-length, Adams-style exposure records and not even knowing what film I’m shooting, and that works for me. In fact, I’m getting so enamored with not fucking that up that I think I’m going to invest in one of those Rite In The Rain waterproof notebooks.


Notebook page

One suggestion: get a notebook with a brightly-coloured cover so you can see it if it falls on the ground in the woods. Black, olive green, or camo seems like a bad way to go (YMMV).

Podcast interview about Kodak’s new T-MAX 400 film

Photo News Today‘s Dennis Hays says:

After meeting both John Sexton and [Kodak’s] Scott DiSabato at the 2007 Photoplus Expo in New York, I sit down with them and discuss the introduction of the new [see previous post] T-MAX-400 B&W film. John goes into some detail regarding the films ability and his impressions from use.

As more and more digital cameras are introduced, I wanted to find what Kodak’s thinking was in introducing a new film and who the possible users are. Also, John discusses his workflow with the film and how and why he uses film for his work. A fascinating chat with two ends of the spectrum—a film manufacturer and a film user.

Listen: Direct MP3 link or podcast page (length: 31:56)

Exhibition flyer tips

A lot of people make digital posters announcing art exhibitions. These self-contained nuggets are great, because they can easily be re-posted all over the place to promote the show (which is presumably the goal).

Out of the five Ws (who, what, why, when, where), the most common mistake seems to be incomplete coverage of "where". It’s easy to lose sight of one very important fact: when you post something online, you’re talking to the whole world. It may seem perfectly obvious to you that Flemmingtonville is the next town over, but unless you put it on the flyer, nobody looking at it knows what country you’re talking about, let alone which state or province.

Even the names of well-known places can’t be considered definitive. In the US alone, there are Parises in Arkansas, Idaho, Illinois, Kentucky, Michigan, Mississippi, Missouri, Ohio, Tennessee, Texas; Berlins in Connecticut, Maryland, New Jersey, New Hampshire, Massachusetts, New York, North Dakota, Ohio, Pennsylvania, and Wisconsin; Londons in Alabama, Arkansas, California, Indiana, Kentucky, Michigan, Mississippi, Missouri, Ohio, Texas, Wisconsin…

No matter how clear it seems to you on its own, I suggest fully qualifying the location with street address, city, state/province, and country.

If you want to go the extra mile, I suggest including a bit of text that repeats the name(s) of the artist(s), linked to their web sites. This helps everybody: it helps your potential audience see more work by the exhibitor(s) and hopefully gets them more interested in coming and buying work, it helps the people you want to re-post the info by giving them an easily copy-and-pastable chunk of HTML, and it helps the artists by providing more eyeballs for their work (and increasing their search engine rankings).

They seem like little things, but they can easily be the difference between "hey let’s go!" and "WTF".

Ingenious method for bellows calculations with brass lenses

Brass lens madman enthusiast Jim Galli offered this incredibly useful piece of advice on the Large Format Photography Forum:

Since I almost never use my antiques [lenses] at infinity, (they are usually approaching 1:1 for a portrait) I make my waterhouse stops to “known’s” like 1 inch or 30mm. Then I measure the distance from stop to ground glass and divide a whole number. ie. a stop is a 1 inch hole. I measure the bellows at 22″, I’m at f22. The bellows is stretched out to 32 inches, same lens same stop, f32. No other calcs needed. Reciprocity still needed sometimes of course, but none of the bellows factor gymnastics.

Very smart!

You can see Galli’s work at his Web site, tonopahpictures.0catch.com.